Sunday 16 September 2012

Session 9: Mudguard

At the bottom of the picture, the protrusion
from the frame is what the bolt bolts into.


I have removed the rear mudguard for some attention. It is very simple to do, as there are only 4/5 bolts holding it on, one of which I have removed already with the oil tank. There is a bolt on the left hand side holding it onto the frame, which should be removed. Be careful that the spacer doesn't get lost.


Then remove the two bolts under the seat holding it onto the frame. I didn't have any more bolts to undo, but check to see just in case. Lift the mudguard up to see the wire. There are two wires running from the main loom into the mudguard, one brown and one black. There should be a bullet plug in each at the bike end, which should be disconnected. The mudguard then  lifts out.


 On the underside, I noticed that the screw heads have red paint on them. This might be another indication of the mudguard having been resprayed.


Undo the 4 screws holding the light/number plate unit on, and remove the whole assembly.


 Carefully, peel the rubber on the reflector back from the silver ring, and remove the silver piece and reflector. there should be a small bolt behind, holding it onto the mudguard. Undo this and remove the reflector.


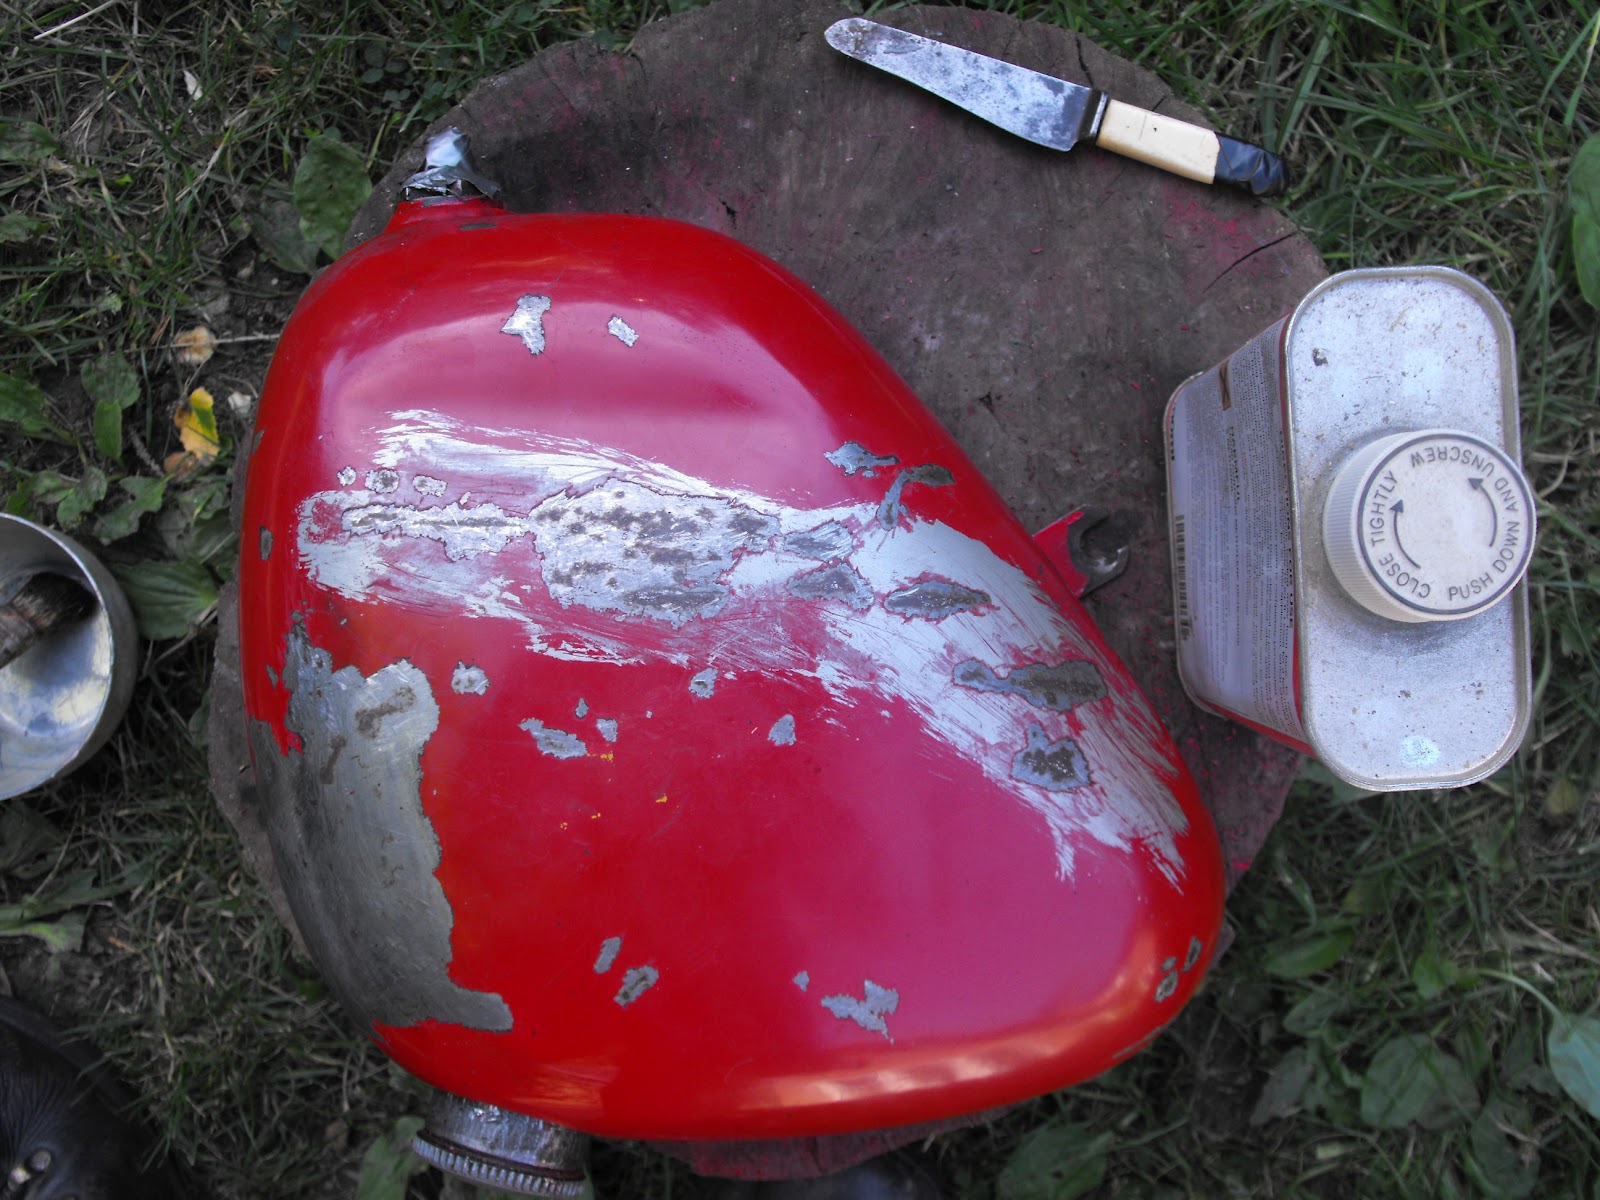
I spent 2 hours cleaning all the muck off it, and discovered an interesting fact. Where the paint was peeling, what looks to be chroming is showing through. This solves a long standing question of why the bike had a painted rear mudguard, and whether that was just an option when new, as it must have been chrome in its past life.
Chrome peeking through


 I have sent an enquiry to a local chroming place to see roughly how much it will cost to get this rechromed, so hopefully that will give me some idea, but before then, I want to try and get it shaped as well as I can.


I have used paint stripper to get all the paint off, revealing the chrome. I can now work on knocking out dents and reshaping without worrying about forcing specks of paint into the metal.


Saturday 8 September 2012

Session 8: Oil Tank and Battery Cover


Tank before paint stripping


I started sanding the oil tank, but large sections of paint just flaked off, and there was rust underneath some with no visible sign on the surface. I took some advice, and used paint stripper to remove all the paint, to great effect.


The paint just bubbles off
The whole tank bubbling off

Paint stripper is very easy to use; brush on a thin coat, dab on a thicker coat, and scrape the paint off. This removed virtually all of the paint, exposing all the rust.


The front of the tank

The back of the tank


I then sanded off the rust using wet and dry paper, to leave a good finish for painting.


 There appears to have been a brazed repair on the back of the tank, to fix the bolt hole. Also, there is a small D stamped into the protruding bracket, andh a couple of dents to fill.


 I then hung it out and primer etched it, using less this time than the battery cover.


 I have also sprayed the battery cover with primer filler. I hung it in the same way, and gave the whole thing a thin coat. I then left it to dry, and repeated. It has got a little too cold to carry on now, so I will give it the final few coats tomorrow.

Thursday 23 August 2012

Session 7: Primer Etching


The inside finished.


I used coarse grit (about 80) wet and dry to sand away the inside of the cover, which was a lot harder to do than the outside. Not only was there more rust, but the shape of it meant that it was more difficult to sand, but I eventually finished.


The outside finished.


I finished the outside in the previous session.


Using a carefully constructed jig, consisting of some bent wire and an old lawnmower cable, and a guttering, I hung the cover outside. 


The outside sprayed.


I then used spray on primer etcher to coat the whole cover in a thin layer. Due to the slightly addictive nature of spray painting, I may have done it a bit thick.


On the inside, the metal loop caused me some trouble, as I couldn't see underneath it to check it was painted, so I put slightly too much on in that area. There is a small run, but it is on the inside, and can easily be sanded off.


All in all, this has been a successful exercise, and I now know what to do for the other parts that need painting. In September, I will finish this cover, and start on the oil tank.

On a completely unrelated note, I have found a parts supplier. Draganfly Motorcycles appear to sell most of the parts we need, and will probably be our source of parts. they sell a repair kit that exactly suits the gear selector shaft for this bike, which will make life easier.

Sunday 19 August 2012

Session 6: Sanding

It's been some time since my last post, i've been sidetracked with other things. I'm going on holiday next week, but will try and keep doing a bit when I can.

I wrote to the BSA owners club a few weeks ago, but managed to send them the front lug casting number instead of the frame number, which was a bit of a rookie error. I corrected the problem, and they have replied with the following information:

"I can confirm that a machine with this frame number was despatched as a 250cc C15 Sports Star 80 to W L Lewis and Sons Ltd, Weybridge, Surrey on the 5th December 1961. It was finished in Black.

It still retains its original motor."

This begs the question as to why the colour was changed from black to red, but that is a question for another day.

Black paint peeking through the red
I have started sanding the battery cover as a test piece, to repaint it. I am using 240 and 320 grit wet and dry paper, wet, to remove any traces of rust and to smooth the outside. While sanding, I got another indication that it used to be black, as the original paint started to show through. There are small pockmarks of rust all over the cover, so I have been scraping around them, to ensure all the rust is visible, before sanding it off.


My setup: cover, paper and water.

Inside
Outside
These pictures show the battery cover before I started sanding, for reference. The inside is very rusted, and will probably all need sanding off. The outside has lots of small pockmarks, but is largely fine.


This is an intermediate step, where I have started to expose and sand off the rust.


I have finished sanding the outside, and will start on the inside tomorrow. I have smoothed it all out, and got rid of any trace of rust. The picture below shows the finished product, and confirms that the bike was originally black.


The outside finished.


Tuesday 5 June 2012

Session 5: Gear Selector Part 2

Right, continuing from the previous post, we will dig down to the gearbox, and remove the selector, which we need to replace.

5. Remove kickstart spring
The spring and washer from the kickstart


Twist off the spring and tab washer, but be careful in case it is under any tension.


6. Remove camplate spindle

The spindle and split pin
Remove this plate.

On pre-1965 engines, there is a small rectangular plate, with a cork gasket. Undo the two screws, and remove the plate. Then, pull out the split pin, and remove the camplate spindle from the left hand side.


7. Remove camshaft nut

The nut and washers. The two washers fit
 into each other, as shown. 


If you can get the bike into gear, it is much easier to remove the nut, as the shaft cannot turn so easily. Take off the nut, and two washers, one on the other. Be careful, as trying to remove this nut can cause the piston to move, so if it isn't free, be careful of causing damage.


8. Undo screws

The different lengths of screw. 

Undo all the crosshead screws, to release the inner gearbox cover. There is one screw, which should have a flat head, next to the kickstart shaft, which should be left alone. Again, I could recommend ensuring you know where they came from, as they are different lengths.


9.Remove inner gearbox cover

Ready to remove the inner
gearbox cover. 
The inner gearbox cover should now be ready to remove. We found that it was catching on the frame of the bike, so we unscrewed a couple of engine mounting bolts, and lifted the engine slightly. You may find that whatever was used to make a seal around the join is holding the cover on. Carefully use a block of wood and a hammer to gently tap the side of the casing, making sure not to directly hit the aluminium with the hammer. the cover should then lift off.


The gearbox. 

10. Remove gear selector shaft
The gear selector shaft. 


There is a bolt below the gear selector shaft, which when undone, allows the shaft to be easily removed.


I will now try and find a supplier of BSA parts, to buy a new shaft, as this one has been drilled and ruined. This may take some time, so I will probably go back to doing other jobs, or start painting for the next session.

Some pictures from the inside of the gearbox:

The kickstart, bottom, and gears above it. 

Timing gear. 

Saturday 2 June 2012

Session 4: Gear Selector Part 1

As previously mentioned, the gear selector shaft needs replacing, to rectify repairs Dad made to keep it going in the past. The splines on the end which hold the lever on wore off, so he drilled through the shaft and bolted the lever on. Here is how to go about getting to the gears, and changing the shaft.

1. Remove oil


The drain plug, on the underside of the gearbox.
Note the bolt, in the centre of a larger bolt. 
There is a double bolt on the bottom of the gearbox. the inside of it has a long rod, which shows the oil level, and the outside is a drain plug. The little book we have has an interesting fact, that pre-1965 engines like this had the gauge wrong on the bolt. According to the book, an extra 1/4 of a pint should be added once the gauge is full. Engines built after 1965 had a corrected gauge. When I removed the bolt on ours, no oil came out, as we expected.


2. Remove levers
The two levers, kickstart on the left,
and the gear selector on the right. 


The kickstart lever, and gear selector need to be removed, before the cover can come off. The kickstart has a cotter pin, so undo the nut, and knock the pin out. The lever should then come off. The gear selector should have a splined end and clamp holding it on . On this bike, many years ago, Dad drilled it out, and there is just a standard nut and bolt. The shaft and selector need replacing, so we can return it to how it originally was.
After the levers have been removed. 


3. Remove exhaust

The bike sans exhaust. 

Taking the exhaust off is very easy, by removing two bolts. One bolt is the right hand passenger foot peg, bolting the muffler to the frame. When removing it, remember which way the bolt turns, as it is the other way over. It is common sense, but it's very annoying if you try the wrong way. The other bolt is at the front, bolting the pipe to the frame. The driver right footpeg needs turning, by loosening the bolt on the back, and turning it until it is out of the way. Once you have removed the bolts, and turned the footrest, the exhaust should rotate and lift off.

The exhaust, full of horrible powdery dust. 


I found the exhaust was full of powdery dust. Don't worry too much if some goes into the hole in the engine, because it will be blown out when you start it, but it may be a good idea just to knock it out.


4. Undo bolts

My drawing, showing the bolts. The view is as
you face the right hand side of the engine. 

The gearbox outer cover is held on with a bizarre assortment of bolts, around the outside. Dad bought a set of allen head bolts for it, which are currently fitted, but we still have the original bolts somewhere. Simply remove the bolts, and lift the cover off. I used a crude drawing to make sure I knew where the bolts went.


The cover, after removal. 

The kickstart assembly.


The pictures to each side show how it should look at this step. The engine is pre 1965, so later engines may look slightly different.


I will continue the disassembly, removal and reassembly in a day or two, when I have more time. On a totally unrelated note, I wrote to the BSA owners club last week, so they will hopefully send me the original manufacturing records. The records should state the original colour, so I know what to paint it.